1. Introduction
Visual Studio Code (VS Code) is a lightweight, extensible code editor. It is the main working environment in this course where you can write code, run it, work through debugging, explore data, and keep your work organised.
Think of VS Code as your digital workspace. Instead of switching between many tools, it brings code editing, terminals, notebooks, and version control together in one place. VS Code understands Python and helps you write cleaner code and spot problems earlier.
VS Code is especially well suited for geospatial programming. You can work with Python scripts and Jupyter notebooks side by side, run Conda commands in an integrated terminal, and track changes with Git without leaving the editor. As projects grow in size and complexity, this integration becomes increasingly important.
Another reason we promote VS Code is balance. It is lightweight enough to start quickly, but powerful enough to support professional workflows. You can begin with a minimal setup and gradually add features as you need them.
In this chapter, you will learn how VS Code fits into the Python workflow and how to use it as a reliable development environment for geospatial programming.
2. Learning Objectives
After working through this chapter, you should be able to:
Work productively in VS Code as your main workspace.
Select and verify the correct Conda interpreter in VS Code.
Run Python scripts and Jupyter notebooks inside VS Code.
These objectives focus on using VS Code as part of a practical workflow. You will build on them throughout the course as your projects become more complex.
3. Installing VS Code
To install Visual Studio Code, go to the official website: https://
The site automatically detects your operating system and suggests the correct installer.
VS Code is available for Windows, macOS, and Linux, and the installation is quick on all platforms.
Download the Windows installer (
.exe).Run the installer and follow the setup wizard.
Keep the default options unless you know you want something different.
Download the macOS installer (
.dmg).Open the file and drag Visual Studio Code.app into the Applications folder.
Start VS Code from Applications or Spotlight.
On macOS, you may need to confirm that you trust the application the first time you open it.
Optional but recommended: keep VS Code in your Dock for quick access.
Download the appropriate package for your distribution (
.debor.rpm).Install it using your package manager or by opening the downloaded file.
Alternatively, follow the instructions on the VS Code website for your distribution.
When you open VS Code for the first time, you will see a welcome screen with helpful getting-started information.
To help you navigate the different features and panels more easily, you may want to watch this beginner tutorial.
At this point, VS Code is installed and ready. In the next sections, you will set it up for Python and geospatial work.
4. Essential Extensions
VS Code becomes powerful through extensions. Extensions add language support and tools that turn the editor into a full development environment. For this course, you only need a small core set to get started.
You can always add more later. Start simple.
Core extensions
These two extensions are essential for this course.
Python by Microsoft
This is the foundation for all Python work in VS Code.
It provides:
code completion and syntax highlighting
error detection and basic linting
debugging support
integration with Conda environments
Without this extension, VS Code does not really understand Python.
Jupyter by Microsoft
This extension adds native support for Jupyter notebooks inside VS Code.
It allows you to:
open and run notebooks (
.ipynb) directly in the editorselect Conda environments as notebook kernels
mix code, text, and output in one place
This is especially useful for exploratory geospatial analysis.
Installing extensions
There are two common ways to install extensions.
Using the Extensions panel
Click the Extensions icon in the left sidebar.
Search for the extension name.
Click Install.
Using the Command Palette
Open the Command Palette.
Windows and Linux:
Ctrl + Shift + PmacOS:
Cmd + Shift + P
Type
Extensions: Install Extensions.Search for and install the extension.
Once installed, extensions activate automatically.
If you get stuck, you might find it helpful to watch this video on VS Code extensions.
What not to install yet
VS Code offers thousands of extensions. It is tempting to install many of them, but this often causes confusion early on.
For now:
Do not install many formatters, linters, or AI tools.
Do not change many settings.
Do not try to optimise everything before you understand your workflow.
You will add more tools later, once you know what you need.
In the next section, you will connect VS Code to your Conda environment and run your first Python code inside the editor.
5. Connecting VS Code to Conda
VS Code may detect Python environments automatically, but you should still explicitly connect your workspace to the correct Conda environment. This ensures your code uses the correct packages. Skipping this step is one of the most common causes of setup errors.
Think of this as selecting your project’s toolbox. It helps ensure that your scripts, notebooks, and terminal all use the same Python interpreter.
Selecting a Conda environment
Before selecting an environment, first open your project folder in VS Code.
Go to File → Open Folder.
Select the folder of your project.
This folder becomes your workspace.
VS Code remembers the Python environment per workspace, not globally.
Interactive Explorer: VS Code Workspace Wiring.
Click through the steps to open a project folder, select the sds210 Conda environment, and run a script or notebook. Watch how the workspace, terminal, Python script, and notebook kernel become connected to the same interpreter. For improved visibility of the explorer, follow this link.
Then select the environment:
Open the Command Palette.
Windows or Linux:
Ctrl + Shift + PmacOS:
Cmd + Shift + P
Type Python: Select Interpreter.
Choose your Conda environment, for example
sds210.
Once selected, VS Code stores this choice for the current workspace.
Verifying and using the environment
You can always check whether VS Code is using the correct environment.
Look at the Status Bar at the bottom of VS Code. You should see the environment name and Python version.
Or run this in a Python file:
import sys
print(sys.executable)
The printed path should point to your Conda environment, not to a system Python.
For Jupyter notebooks:
Open a
.ipynbfile.Click Select Kernel in the top right.
Choose the same Conda environment you selected before.
This keeps notebooks consistent with your scripts.
Once VS Code is connected to Conda, you are ready to work productively: writing code, running notebooks, and managing projects with confidence.
6. Working with VS Code
Now that VS Code is installed and connected to your Conda environment, this section focuses on how you actually work in it day to day. The goal is not to learn every feature, but to become comfortable with a small set of workflows that you will use throughout the course.
From here on, VS Code is a convenient place where you write code, run notebooks, and manage your projects.
Before diving into Python, notebooks, or geospatial libraries, it is worth getting comfortable with the basic ideas behind how VS Code works. This will save you time and reduce confusion later.
The main interface
VS Code looks simple at first, but it is built around a few clearly defined areas. The labels in the figure correspond to the sections below.
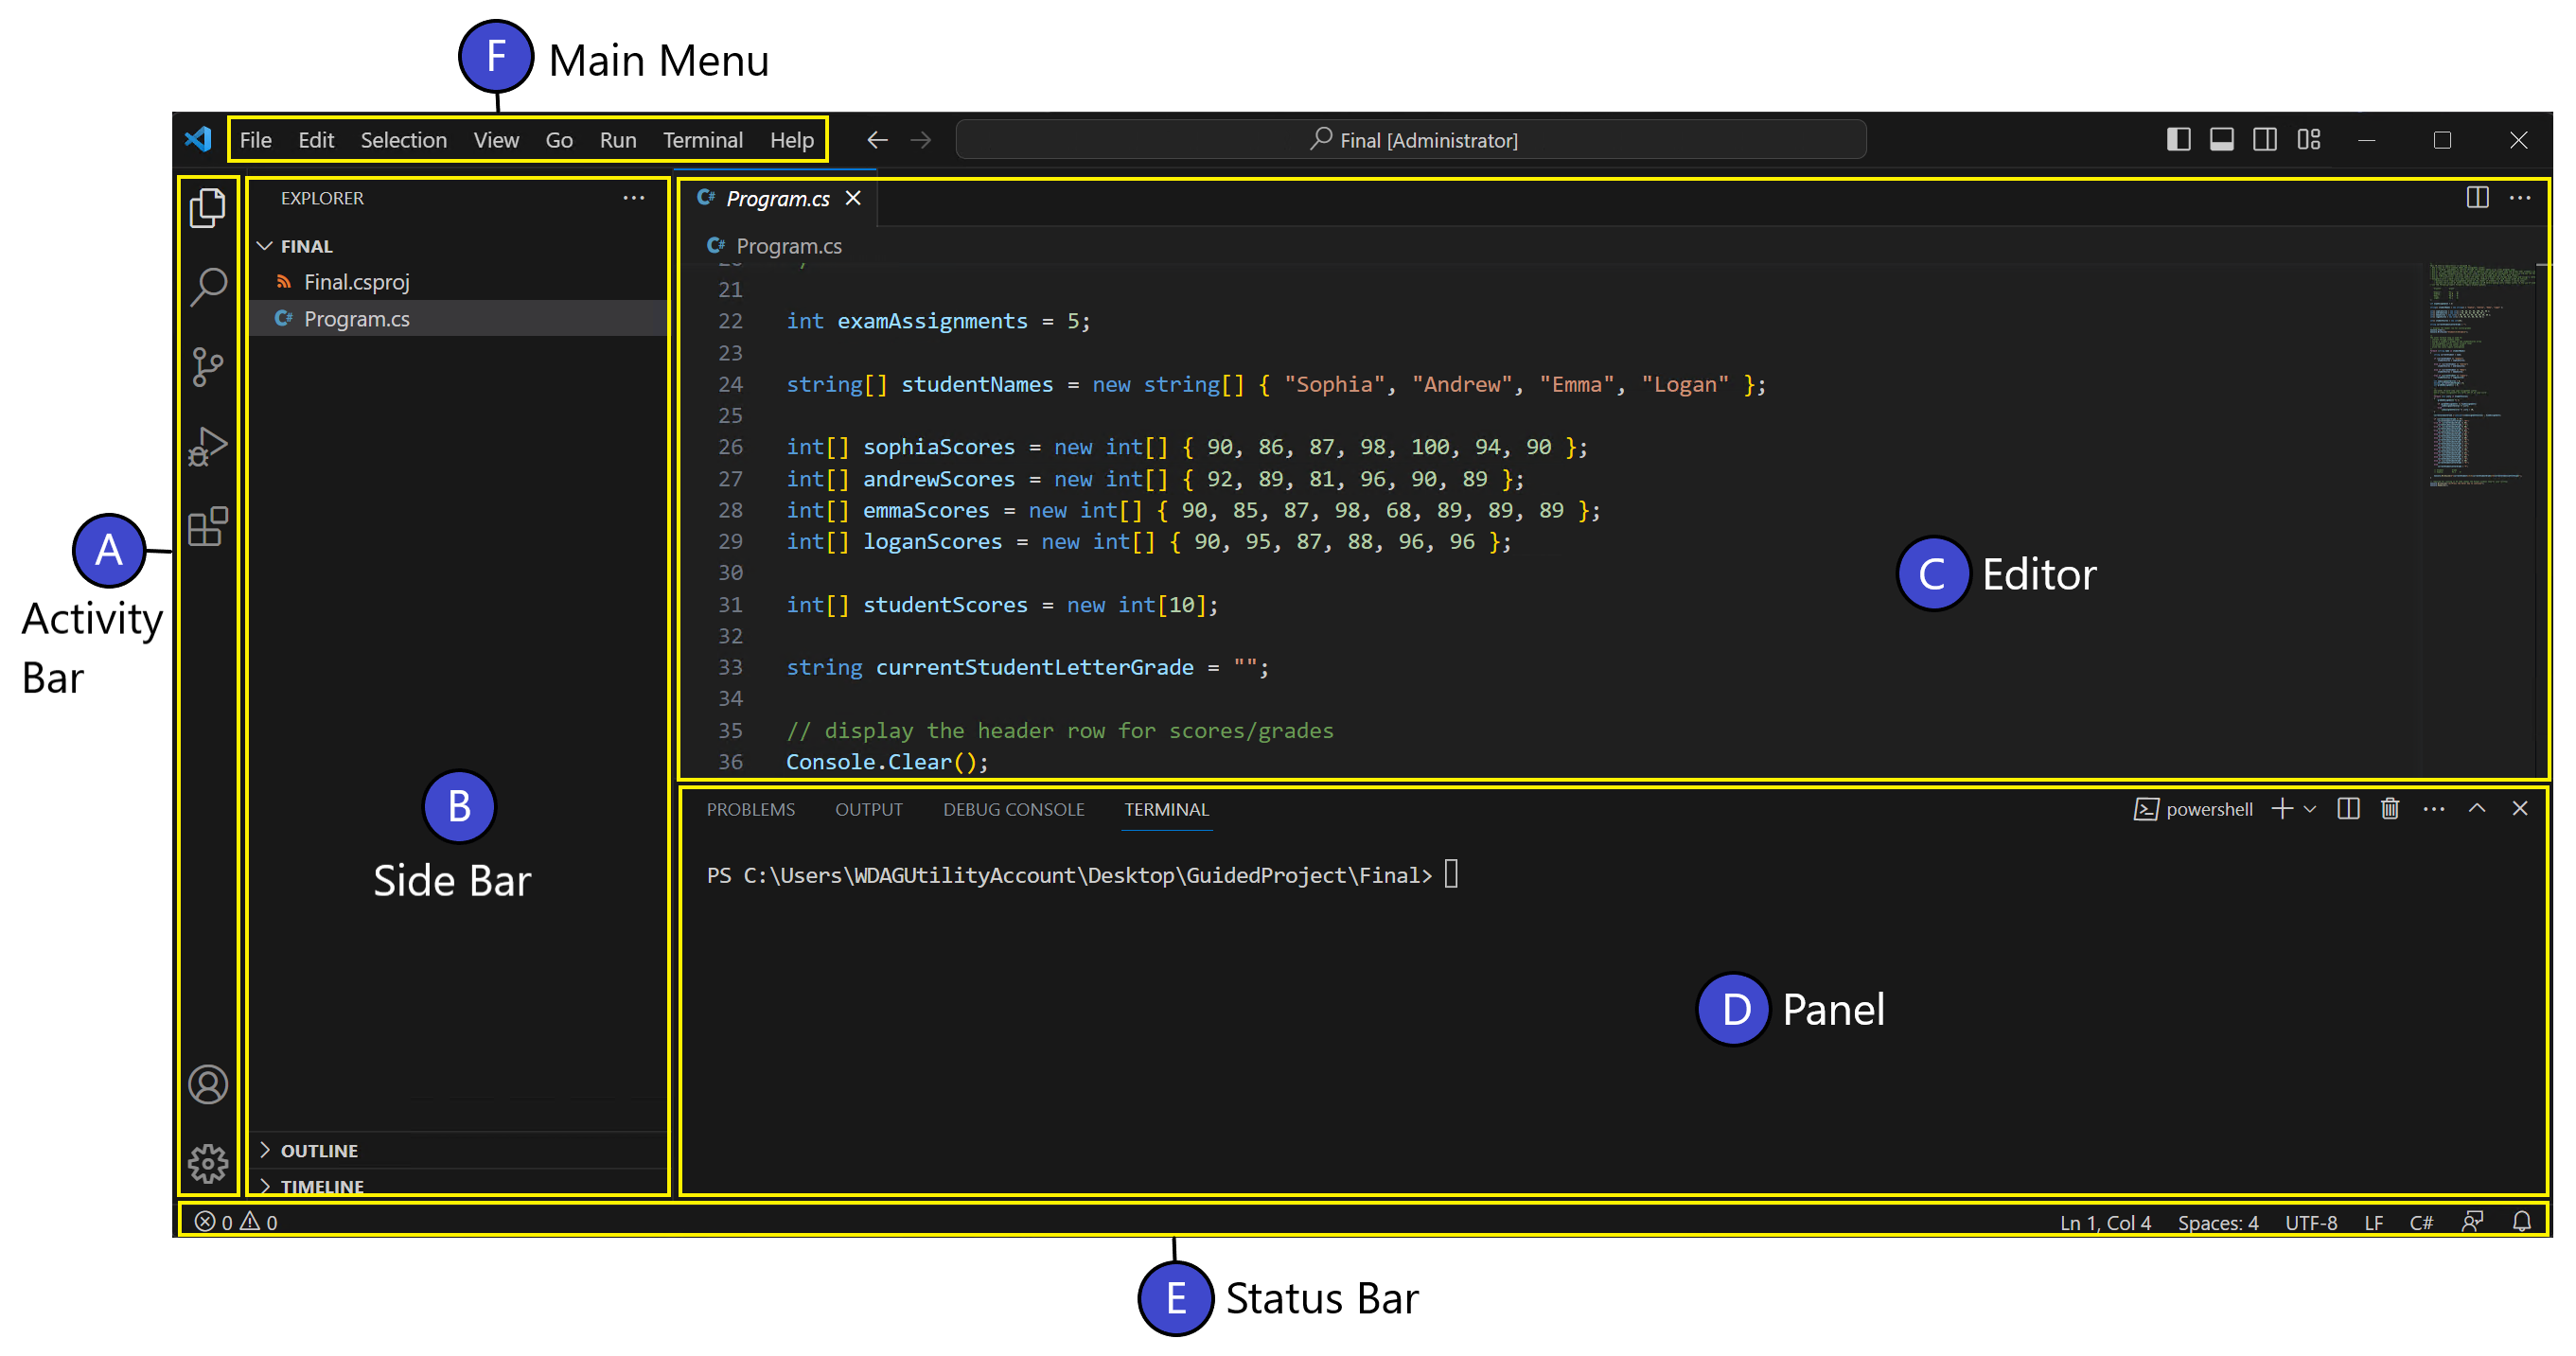
Visual Studio Code user interface.
A. Activity Bar
The Activity Bar runs vertically on the far left. It lets you switch between major views such as the Explorer, Search, Source Control (Git), Run, and Extensions. Think of it as the navigation spine of VS Code.
B. Side Bar
The Side Bar shows the content of the currently selected activity. Most of the time, this is the Explorer, where you see your project folders and files. When you switch activities, the Side Bar adapts accordingly.
C. Editor
The Editor is the main working area in the center. This is where you write Python scripts, edit notebooks, view files, and inspect results. You can open multiple files side by side and switch between them using tabs.
D. Panel
The Panel appears at the bottom and hosts tools such as the Terminal, Output, Debug Console, and Problems view. You will frequently use the Terminal here to activate Conda environments, install packages, and run code without leaving VS Code.
E. Status Bar
The Status Bar runs along the bottom edge of the window. It shows important context such as the active Python interpreter, Conda environment, file type, and cursor position. If something behaves unexpectedly, this is often the first place to check.
F. Main Menu
The Main Menu at the top provides access to all VS Code functionality, including opening folders, managing settings, running code, and controlling the editor layout. Many menu actions are also available through the Command Palette.
You do not need to memorize all of this. As you work, these areas will quickly become familiar and help you stay oriented while coding and exploring data. You will likely spend most of your time in the Editor, Explorer, Terminal, and Status Bar.
The workspace
VS Code works around the idea of a workspace, which is usually a folder on your computer.
When you open a folder in VS Code:
all files in that folder become part of your project
settings such as the selected Python environment are stored for that project
the integrated terminal opens in the correct directory
See your project folder as a place that keeps your code, data, notebooks, and environment configuration in one place.
The Command Palette
The most powerful feature in VS Code is the Command Palette.
Open it with:
Ctrl + Shift + Pon Windows and LinuxCmd + Shift + Pon macOS
The Command Palette lets you:
select Python interpreters
install extensions
open settings
run VS Code features without searching through menus
If you are unsure where something is in VS Code, open the Command Palette and search for it.
Integrated terminal
VS Code includes a built-in terminal that runs inside your workspace.
You can use it to:
activate Conda environments
install packages
run Python scripts
start JupyterLab
Open it via:
View → Terminal
The terminal usually starts in your project folder, which helps avoid many path-related mistakes.
Editing and running code
VS Code is more than a text editor. It understands Python and helps you write better code.
A typical workflow is:
Create a new Python file.
Write code with syntax highlighting and auto-completion.
Run the file directly from VS Code.
Inspect output in the integrated terminal.
You can run a Python file in several ways:
Run → Run Without Debugging
right-click in the editor → Run Python File
use the integrated terminal
VS Code uses the Python interpreter from your selected Conda environment.
Jupyter notebooks
VS Code also supports Jupyter notebooks directly inside the editor.
This allows you to:
explore data interactively
mix code, output, and explanations
use the same Conda environment as your scripts
Scripts and notebooks can live side by side in the same project and use the same environment.
In this course, you will mainly use the following files:
.ipynbfiles for Jupyter notebooks.pyfiles for Python scripts.ymlfiles for Conda environmentsfolders such as
data,notebooks, andsrc(short for source)
VS Code understands all of these file types and adapts its interface automatically.
VS Code is more than a text editor. It keeps code, environments, and notebooks connected at the project level. Once you open the right folder and select the right environment, most things just work.
7. Exercises
These exercises help you practise the basic VS Code workflows you can use throughout SDS210. They are designed to be short, practical, and focused on habits rather than features.
Take your time. If something does not work, use it as a chance to explore the interface and ask questions.
Exercise 1: Opening a project workspace
Goal
Learn how VS Code works with folders and projects.
Create a new folder on your computer called
sds210-vscode.Open VS Code.
Use File → Open Folder and select
sds210-vscode.Inside VS Code, create the following folder structure:
datanotebookssrc
Create a file
src/DIDit.pywith:print("Every machine that is clever enough to pass the Turing test could also be clever enough not to pass it.")Save the file.
This folder is now your workspace. VS Code will remember settings for this project.
Exercise 2: Connecting VS Code to Conda
Goal
Make sure VS Code uses the correct Python environment.
Open the Command Palette.
Windows or Linux:
Ctrl + Shift + PmacOS:
Cmd + Shift + P
Select Python: Select Interpreter.
Choose your Conda environment, for example
sds210.Open
DIDit.py.Run the file using Run → Run Without Debugging.
Check:
Output appears in the integrated terminal.
The Status Bar shows the selected Conda environment.
Optional check:
import sys
print(sys.executable)
The path should point to your Conda environment.
Exercise 3: Working with the terminal and notebooks
Goal
Use VS Code as a single place for code, commands, and notebooks.
Open the integrated terminal.
Activate your Conda environment.
Run:
python --versionCreate a new notebook
notebooks/DUTgemacht.ipynb.Select the same Conda environment as the kernel.
Run a code cell with:
print("Die Proletarier haben nichts zu verlieren als ihre Goldkettchen.")
Confirm that:
The notebook runs without errors.
Scripts and notebooks use the same environment.