1. Introduction
At some point, this might happen: you delete a function that definitely worked yesterday, a notebook experiment goes wrong, or you realise that your final_final_v3.ipynb is not final at all.
This is where Git comes in.
Git is a version control system that tracks every change you make to your project files. It builds a complete history of your project, step by step. You can go back in time, compare versions, undo mistakes, and understand what changed, when, and why. Think of Git as a never-forget undo button for your code and notebooks.
This is especially useful in spatial data science, where projects evolve through trial and error. With Git, you can:
experiment freely without losing any work
understand what changed and why
collaborate without overwriting each other
Git works locally on your computer and integrates well with tools you will use, such as VS Code and Jupyter notebooks. Combined with platforms like GitHub, it also lets you back up and share your work in online repositories.
2. Learning Objectives
After working through this chapter, you should be able to:
use Git to track changes in code and notebooks
save and restore project states using commits
sync a local project with GitHub
These objectives focus on using Git as a practical safety net in your daily workflow. You will keep building on them as your projects grow and become more collaborative.
3. Git vs. GitHub
Before learning any commands, it is important to get the big picture right. One of the most common sources of confusion is mixing up Git and GitHub.
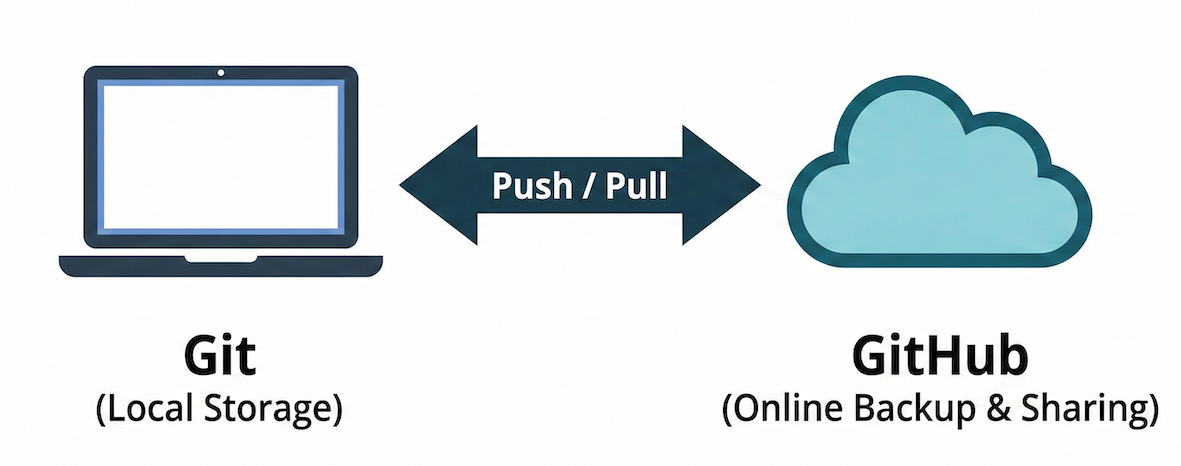
Git is the software running on your computer. GitHub is the online platform where you store and share your Git repositories.
Git runs on your computer.
It tracks changes to your files and stores the full history of your project locally. You can use Git completely offline. A Git repository is best thought of as a timeline of your project. Each point on that timeline is a commit, a snapshot of the entire project at a specific moment. Every commit includes all tracked files exactly as they looked then, plus a short commit message explaining what changed.
How Git thinks: Git does not save separate “versions of files” like script_v1, script_v2, and script_final. Instead, it saves project states over time. If a file did not change, Git simply reuses it internally. Because every commit is a snapshot, nothing is overwritten. The past is still there, so you can go back or undo mistakes.
GitHub lives online.
It hosts Git repositories on the web and acts as a shared, central copy of your project. GitHub allows you to back up your work safely, collaborate with others without overwriting their changes, and share your work publicly. GitHub does not track changes by itself; it stores and synchronises the history created by Git.
What happens where?
Locally with Git: edit files, track changes, create commits, and view history.
Online with GitHub: store a backup, sync between machines, collaborate, and share code.
4. Git Setup
Before using Git in practice, we set it up once. This removes friction later and avoids confusing errors.
Step 1: GitHub account
Log in to your GitHub account. If you do not have one yet, create an account. Use an email address you will remember, as you will need the same one for Git.
Step 2: Git installation
Check in your Terminal whether Git is already installed:
# Check Git version
git --version

# Check installation location
which git   # macOS/Linux
where git   # Windows
If Git responds with a version number, you are ready. If not, use this link to install Git for your operating system, test it with git --version, and then come back here.
Step 3: Identity configuration
Git needs to know who you are. Set your name and email once:
# Replace with your actual name and GitHub email
git config --global user.name "[Your Name]"
git config --global user.email "[your@email]"
This information is attached to every commit you make.
Step 4: Verify everything
Check your setup:
# View all global configuration
git config --global --list5. Understanding Git
Before diving into commands, let us understand the key concepts that make Git powerful for geospatial programming.
Core Git Concepts
Repository: A project folder that Git watches. It contains your files and the hidden information Git uses to track changes and history.
Commit: A snapshot of the project at a specific moment in time. Think of it as a reliable save point. Each commit has a unique ID, includes a short message explaining what changed, and once created, is a state you can always return to.
Branch: A parallel timeline of the same project. The
mainbranch contains stable, working code, while other branches are used for experiments. Branches let you try things out without breaking what already works.Remote: A linked copy of your repository stored online, for example on GitHub. While Git manages history locally, remotes allow you to back up your work, sync between machines, and collaborate.
The Git Workflow
Almost everything you do with Git follows the same simple loop:
Edit → Stage → Commit → Push
If you understand this loop, Git will feel much less mysterious.
Interactive Explorer: Git Workflow Conveyor.
Click the workflow buttons to move a changed file from the working directory into the staging area, save it as a commit, and push it to GitHub. The animation shows that Git does not magically save every edit; you deliberately choose, snapshot, and sync your work step by step. For improved visibility of the explorer, follow this link.
Working directory (edit): This is your normal project folder. You edit files here, such as scripts and notebooks. At this point, Git is only watching, and nothing is saved to history yet.
Staging area (select): This is where you choose which changes should go into the next snapshot. You decide which changes form a logical step together; you do not have to commit everything you edited at once.
Think of staging as saying: “These specific changes are ready to be saved.”
Commit (save a snapshot): This creates a permanent snapshot of the staged changes and adds it to the project history. Once committed, that state is safe.
Push / Pull (sync with GitHub): These commands align the histories of your computer and your linked GitHub remote.
push → send your local commits to GitHub for backup or sharing.
pull → bring remote changes from GitHub back to your computer.
Git in VS Code
VS Code includes built-in Git support. If Git is installed on your system, no additional extensions are required.
In the Source Control panel, shown by the branch icon on the left, you can see the same workflow visualised: modified files move to staging (‘Changes’), staged files move to a commit (‘Generate Commit Message’), and committed changes move to push (‘Sync Changes’). VS Code also provides a visual difference viewer, which helps you inspect changes line by line before staging them.
Working directory → Staging area → Local history → GitHub
     (edit)            (add)         (commit)      (push)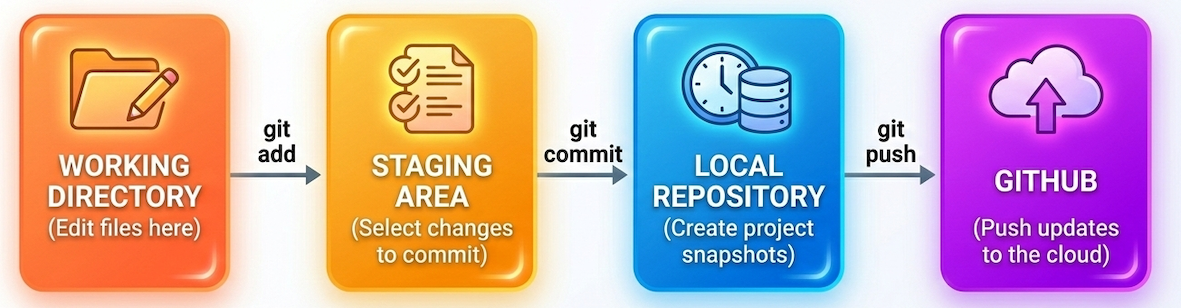
The core Git loop: editing files, staging the specific changes you want to save, committing them to history, and pushing the backup online.
Git is a loop that is repeated over and over again — and it will be the backbone of your projects.
6. Working with Git
In this section, you will learn how to use Git in practice. We will cover two distinct workflows you will use in this course:
syncing the course material
managing your own personal projects
Workflow A: Syncing the SDS210 Course Material
Throughout this course, new practical notebooks are released weekly on GitLab. Instead of downloading ZIP files every week, you can use Git to download the repository once and update it with a single command.
1. Navigate to your desired location
Open your terminal: Terminal on macOS/Linux, Git Bash or Anaconda Prompt on Windows. Decide where you want to store the course folder and use cd (change directory) to go there.
# Example (macOS/Linux):
cd ~/Documents

# Example (Windows, Git Bash):
cd /c/Users/<username>/Documents2. Clone the repository once
Download the repository to your computer. This creates a new folder called sds210/ in your current directory.
git clone https://gitlab.com/HendrikWulf/sds210.git3. Enter the repository folder
This is the step that is most frequently forgotten. To run Git commands on the course material, you must be inside the folder that contains the hidden .git directory.
cd sds210If you list all files, including hidden files, you should see the course files and folders, including the hidden .git folder:
ls -a4. Update the repository weekly
Whenever new notebooks are added to the course, open your terminal, navigate inside your sds210 folder, and pull the updates:
git pull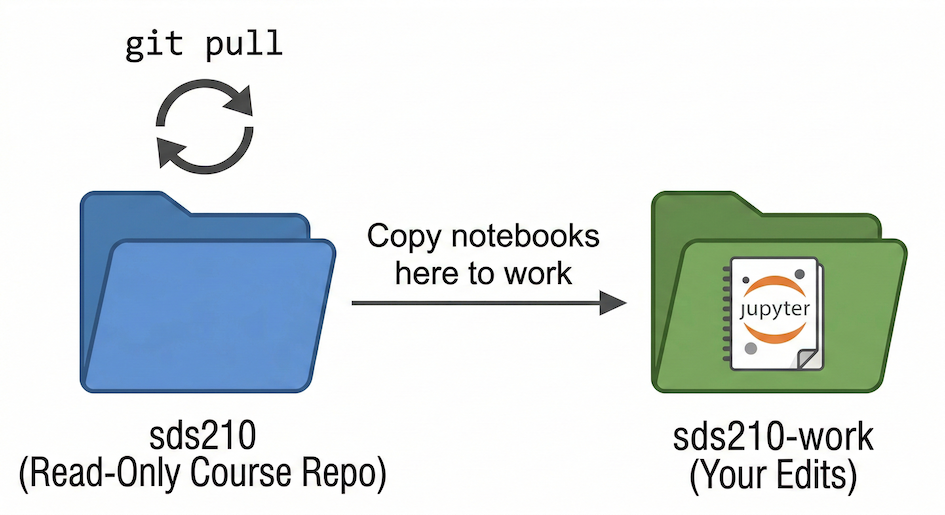
Always copy notebooks out of the main course repository into your personal work folder before editing them to prevent merge conflicts.
Troubleshooting Course Updates
Problem: “fatal: not a git repository”
You are trying to pull, but you are not inside the cloned folder.
Fix: Run cd path/to/sds210 first.
Problem: “Updates were rejected” or merge conflicts
This can happen if you accidentally modified files directly inside the course repository instead of your work folder.
Fix: Move your modified notebook to a safe location outside the repository or rename it. Then inspect the situation with:
git statusIf you are sure that you want the local course repository to match the online version again, you can discard local changes with:
git restore .
git pullWorkflow B: Starting Your Own Project
When you start your own personal project from scratch, such as your final project assignment, you will not clone an existing repository. Instead, you create an empty folder and turn it into a Git repository.
cd ~/Documents/my-geo-project
git init       # Turn the folder into a Git repository
git status     # Check the repository status
Everything now lives only on your computer until you link it to GitHub.
Repository Structure and Ignoring Files
A clear repository structure makes Git more useful. For your personal projects, a simple structure is enough:
my-project/
├── README.md
├── .gitignore
├── data/
│   ├── raw/
│   └── processed/
├── notebooks/
└── outputs/A simple .gitignore for a spatial data science project might look like this:
# Data
data/

# Python cache files
__pycache__/
*.pyc

# Local environments
.venv/
.env

# System files
.DS_Store
Thumbs.db
Tracking Your Changes
Once your personal repository is set up, the everyday workflow starts: edit, stage, commit.
# 1. Check the current state
git status   # Tells you WHAT is different
git diff     # Tells you exactly HOW files changed line by line

# 2. Stage changes (select what belongs in this snapshot)
git add analysis.py
git add .               # Alternatively, stage all changes in the folder

# 3. Commit changes (save the snapshot)
git commit -m "Add NDVI calculation for Landsat 8 imagery"

# Shortcut: stage and commit all already-tracked files at once
git commit -am "Update visualization parameters"Backing Up to GitHub
To safely back up your personal project and share it, you need to link your local repository to GitHub.
Create an empty repository on GitHub first. Then connect your local repository to it:
# Connect local repo to GitHub (run once per project)
git remote add origin https://github.com/<your-username>/<repo-name>.git

# Verify the connection
git remote -v

# Push changes to GitHub for the first time
git push -u origin main

# All subsequent pushes
git push

# If collaborating, download others' updates to your computer
git pullBasic Branching
Branching lets you work on new ideas without breaking what already works. Instead of changing your main project directly, you create a separate timeline for experiments or fixes.
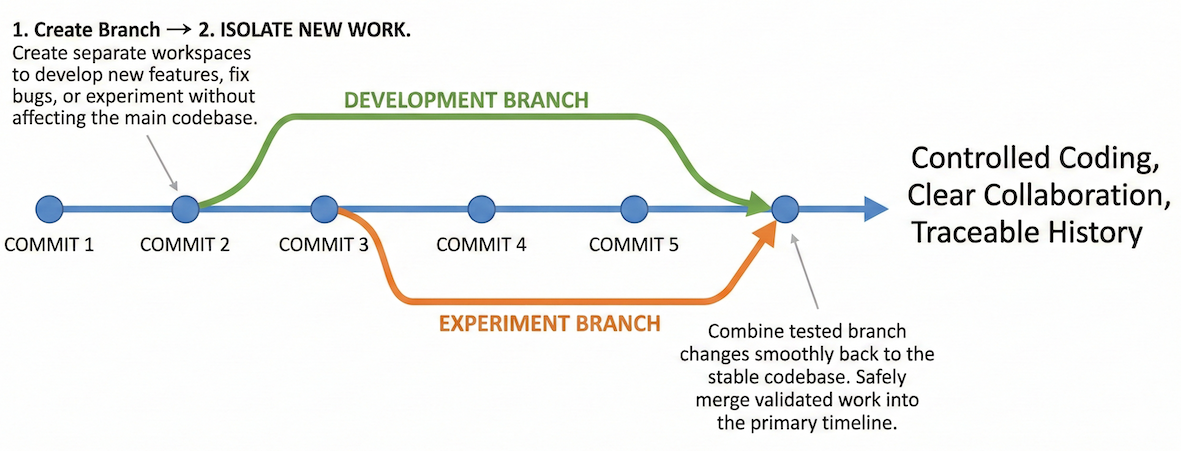
Branching allows you to safely experiment on a parallel timeline without affecting the stable main branch until you are ready to merge.
# Create a new branch called 'experiment' and switch to it immediately
git checkout -b experiment

# Check which branch you are currently on
git branch

# ... edit files, add, and commit your experimental work ...

# Switch back to the stable main branch
git checkout main

# Merge your successful experiment into the main branch
git merge experiment

# Delete the branch after a successful merge to keep things tidy
git branch -d experimentViewing History and Undoing
One of Git’s biggest strengths is that it keeps a complete history of your project.
# Show the full commit history (press 'q' to exit)
git log

# Show a compact one-line history
git log --oneline

# Show commits that affected one specific file
git log -- data_processing.py
Sometimes you realise that the last commit was a mistake, for example because the message was wrong or the commit happened too early. To undo the last commit without losing your work, use:
# Undo the last commit but keep your file changes safe in the staging area
git reset --soft HEAD~17. Exercises
These exercises focus on using Git as a practical safety net. Use the section above as a reference.
Exercise 1: Git setup check
Objective: Confirm that Git is correctly installed and configured.
Open a terminal.
Check that Git is installed:
git --versionCheck your Git identity:
git config --global user.name
git config --global user.email
Verify that your name and email are set correctly and match your GitHub account.
Expected outcome:
Git responds with a version number.
Your name and email are correctly configured.
You are ready to use Git with GitHub.
If this exercise fails, stop here and fix it before continuing.
Exercise 2: Your project repository
Objective: Create a clean project repository and track its first changes.
Create a new folder for a project, for example
my-first-git-project.Initialise a Git repository inside it:
git initCreate the following structure:
my-first-git-project/
├── README.md
├── data/
├── notebooks/
└── src/
Write a short description of the project in
README.md.Check the repository status:
git statusStage and commit your changes with a meaningful message.
Create a new repository on GitHub and connect it as a remote.
Push your commit to GitHub.
Expected outcome:
A GitHub repository with:
a clear folder structure
a readable README
at least one commit
You understand the loop: edit → stage → commit → push.
Exercise 3: Safe experimentation with branches
Objective: Practise experimenting safely using Git history.
Create a new branch called
experiment:git checkout -b experimentMake a small change, for example by editing the README or adding a comment to a file.
Commit the change.
Switch back to the
mainbranch:git checkout mainInspect the commit history:
git log --onelineMerge the
experimentbranch intomain.Delete the branch after merging.
Expected outcome:
You understand that branches are safe workspaces.
You can inspect project history and see how changes evolve.
You feel confident experimenting without fear of breaking things.
After these exercises, you should feel that Git helps you stay in control, mistakes are recoverable, and Git is a tool that supports your learning rather than getting in the way.